
Set up semi-custom signs
Combine fixed artwork, editable text and preset sizes in one customer customiser.
Last updated:
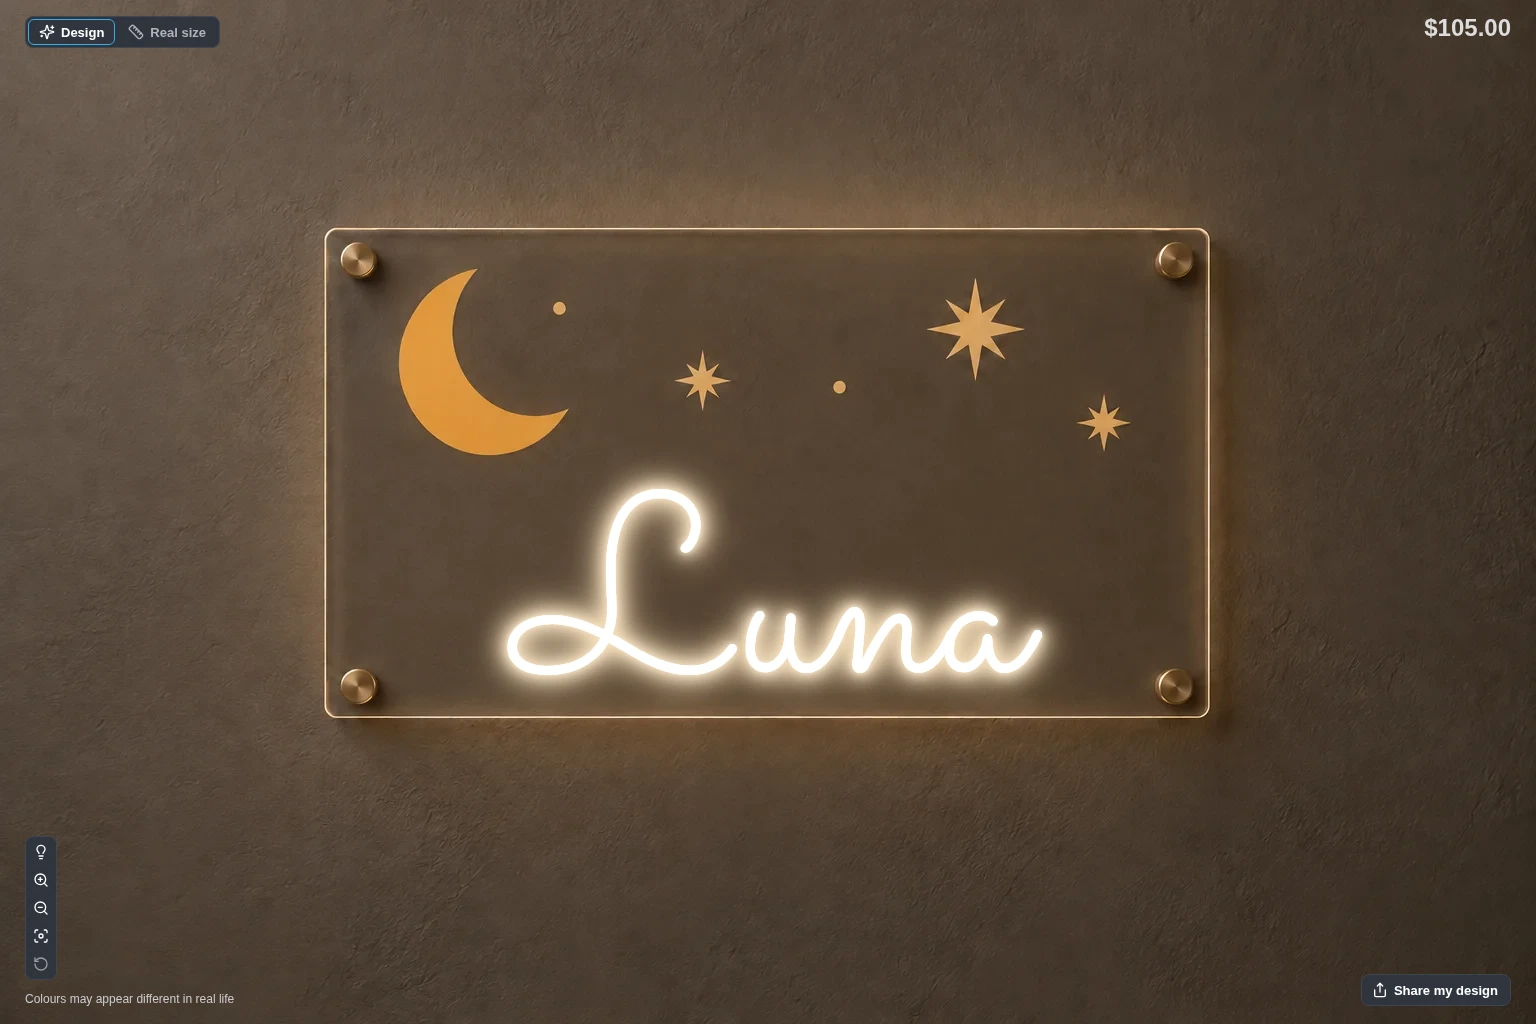
A semi-custom sign combines fixed artwork with text that the customer can change. Use this guide to create an LED neon example with fixed artwork, one editable name, and three preset sizes.
You control the artwork, available fonts, colours, sizes and prices. The customer changes the name and chooses from those options.
The Scene Editor background in this setup is a visual layer. It does not become part of the manufacturing files. A smaller Sign area can make text look smaller without changing the ordered dimensions or manufacturing files. Keep your original artwork separately. Combine the fixed artwork and personalised design in your production workflow. Check that layout before manufacture.
Before you start, prepare your Sign Customiser account, production dimensions, approved fonts, available colours and prices. To show your artwork in cart and order images, use a plan that includes size scaling. The names, sizes and prices shown are examples.
Sign Customiser renders the name in these screenshots. The fixed background contains only the panel, moon and stars.
1. Prepare your artwork and sizes
Create a blank background for each size. Include the fixed artwork. Leave the name area empty, so the customer’s text has its own space.
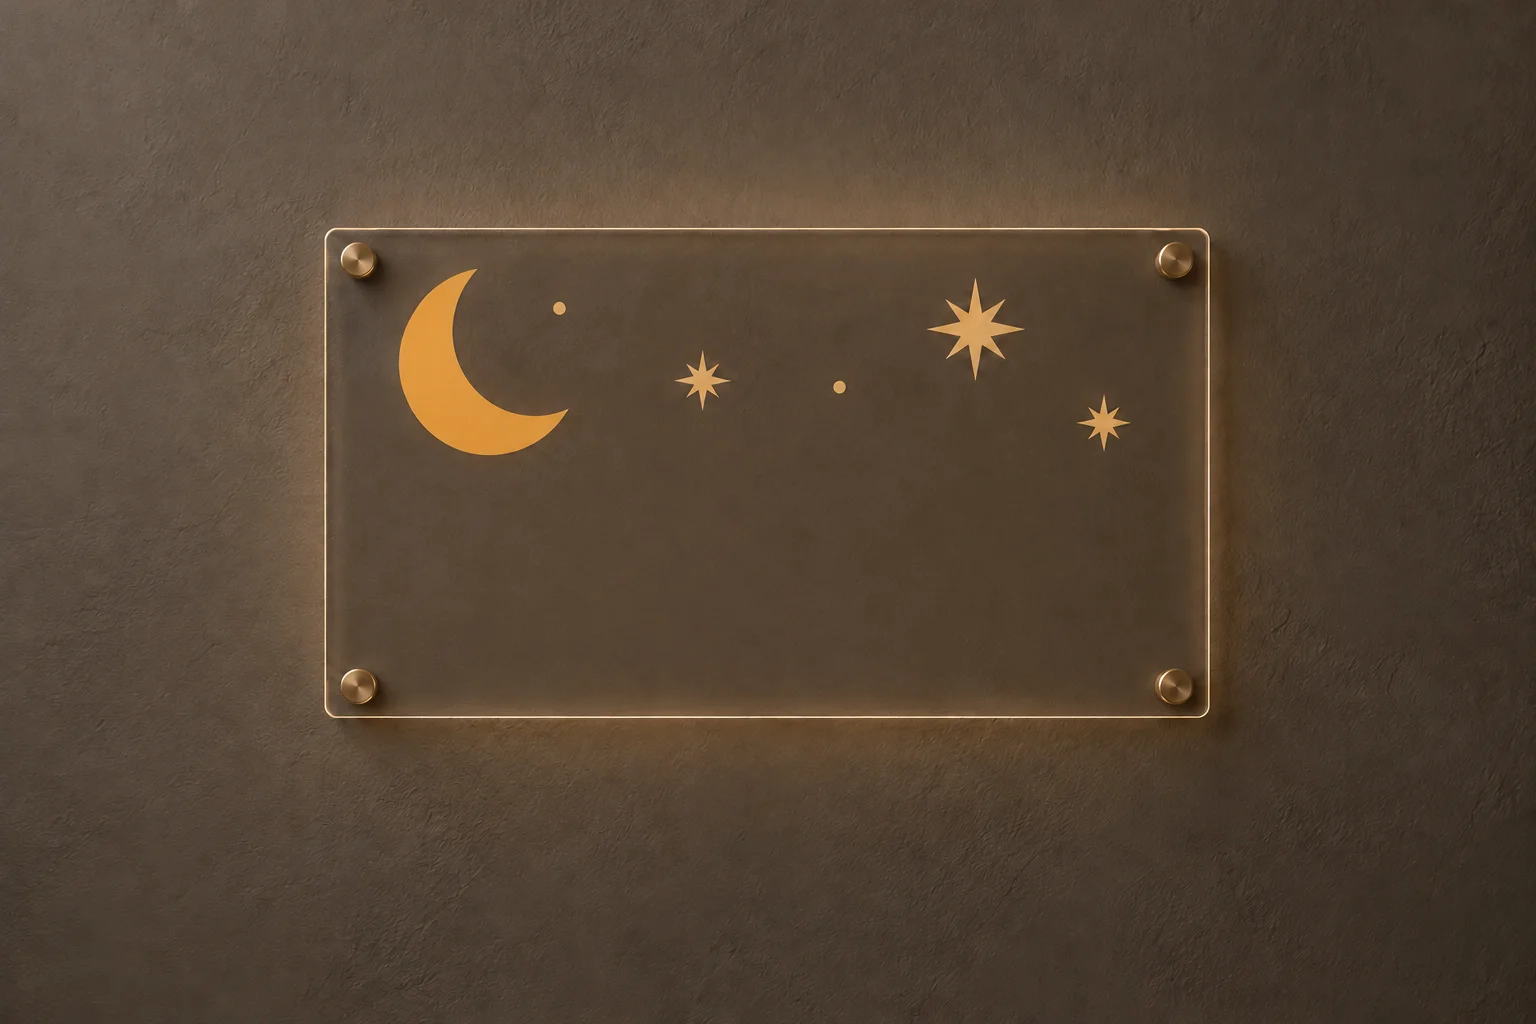
Illustrative background with an empty name area. Prepare your own artwork for production.
Use these example sizes, or your own approved sizes:
| Size | Width | Height |
|---|---|---|
| Small | 30 cm | 20 cm |
| Medium | 45 cm | 30 cm |
| Large | 60 cm | 40 cm |
Prepare the layout for each size. One image can serve several sizes. You can upload up to six backgrounds.
2. Create a Frame Fit customiser
- Open Sign Customiser in your merchant admin.
- From Home, click Create new customiser.
- Click Create your first customiser if the welcome screen appears.
- Complete any measurement and contact email steps. Click Next after each step.
- Choose Neon Letter Signs.
- Click Next.
- Select Price per square meter/foot, marked Frame Fit.
- Click Next to reach Review.
- Clear Include demo data to start with your own settings.
- Click Create.
Frame Fit defines both dimensions of each preset frame. This guide sets a fixed price for each size.
See Quick Start and the Frame Fit overview for more detail.
3. Add the preset sizes
- Open Core Setup → Sizes.
- Click Add Size.
- Enter
Smallin Label. - Under Size Dimensions, enter the width and height.
- Click Save.
- Repeat these steps for Medium and Large.
- Under Custom Sizing, select Disable Custom Sizing.
- Click Save.
Use the measurement unit shown in the form. These examples use centimetres.
These are the ordered Frame Fit dimensions. The empty name area does not redefine them.
For other sizing options, see Sizing with Frame Fit.
4. Set a fixed price for each size
Frame Fit uses one formula. Size boundaries select the price. The formula applies across your fonts.
- Open Core Setup → Pricing.
- Click Add Pricing, or open the existing formula.
- Enter a Label, such as
Semi-custom sizes. - Under Sign Dimension Pricing - (Shipping Unit Pricing), choose Flat parcel.
- Use Add size boundary until the formula has three boundaries.
- Open each boundary.
- Enter its maximum dimensions from the table below.
- Enter your price in Sign Start Price - (Optional).
Set the boundaries in this order:
| Boundary | Maximum Width | Maximum Height | Sign Start Price - (Optional) |
|---|---|---|---|
| 1 | 30 cm | 20 cm | Your Small price |
| 2 | 45 cm | 30 cm | Your Medium price |
| 3 | 60 cm | 40 cm | Your Large price |
Use your own selling prices. Include the fixed artwork and production costs in those prices.
- Set the shipping Price per area unit to
0in each boundary. - Click Done after each boundary.
- Click Save on the pricing form.
The first matching boundary applies. A sign at the maximum dimensions matches that boundary. Keep the smallest boundary first and the largest boundary last.
A zero app shipping rate removes the app’s area-based shipping addition. Your store checkout can still charge for delivery.
Text length does not add a per-character charge. Colour, backboard, mounting and other component charges can still change the total. Set included options to zero additional cost.
For more detail, see Frame Fit pricing.
5. Limit the customer to your text options
- Open Features → Editor Modes.
- Keep Enable Text Editor on.
- Open Core Setup → Custom Designs.
- Turn off Enable AI Sign Designer, if shown.
- Select None under Legacy custom design option.
- Click Save.
- Open Features → Multi-color & Fonts.
- Select Single under Multiple Colour and Font Selections?.
- Click Save.
Add only the fonts that you offer:
- Open Core Setup → Fonts.
- Add a font with a customer-facing label.
- Click Add file to upload its
.ttffile. Alternatively, select Use Google Font. - Click Save.
- Repeat for each approved font.
Open Sign Components → Tube Colors. Add the colours that you offer. Remove any unwanted colours. Check their additional prices.
Set the text limits:
- Return to Core Setup → Sizes.
- Find Character limits.
- Set Minimum Text Characters to
1. - Under Maximum Text Characters, select Character limit.
- Enter the maximum name length that your manufacturer approves.
- Under Maximum Number of Lines, select Line limit.
- Enter
1. - Click Save.
Choose a maximum length that works in the smallest size and every offered font. Test wide letters too.
Open Settings → General Settings. Under Shopper Defaults, set Initial sign text to a sample name, such as Luna. Save the form.
Open Sign Components → Backboards. Add or edit the backboard for your sign. For this example, keep one option named Clear acrylic. Under Visualization, select None. Click Save.
The background already shows the acrylic panel. None prevents a second backboard from appearing behind the name.
Configure the physical backboard and mounting choices separately. The background does not create these components. See Backboards and Mountings.
6. Upload and link the backgrounds
- Open Features → Drag, Scale, Rotate.
- Turn off Enable Dragging, Enable Scaling and Enable Rotation.
- Click Save.
- Open Features → Scene Editor - Background Images.
- Turn on Enable Preview Images.
- Turn off Display default blue/gray background image.
- Turn off Allow customers to upload background images.
- Turn on Enable Review Screen Images.
- In Manage Images, click Add image.
- Upload the blank backgrounds for Small, Medium and Large.
- Click Save.
- Find Size backgrounds, below Visualiser Scaling.
- Click Set size backgrounds.
- Choose one of your images under Default background.
- Under Background for each size, link every size to its image.
- Click Save.
The preview shows the image linked to the selected size. When every size has a link and custom sizing is off, your background choices are hidden. Keep background uploads off too.
If a linking button is disabled, save the Images form first. See size backgrounds for the full rules.
7. Place the text in the Sign area
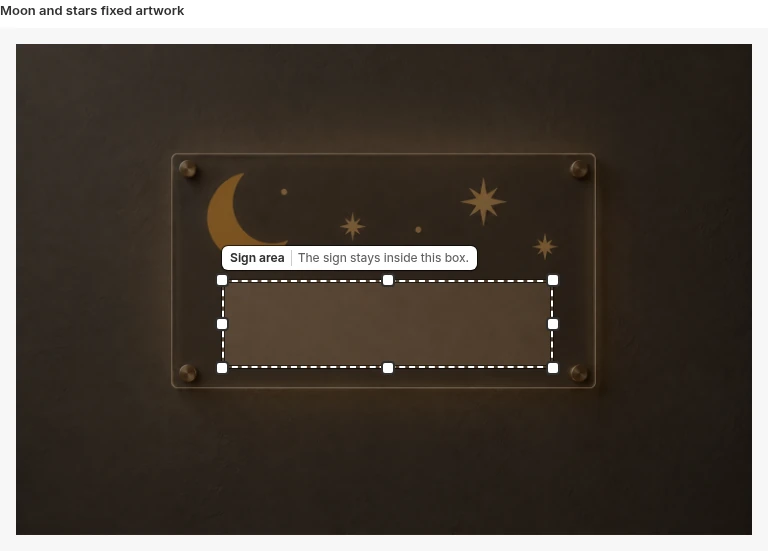
The Sign area editor in the merchant admin. Keep the box clear of the fixed artwork.
- In Manage Images, find the Small background.
- Click Set Sign area.
- Move the box over the empty name area.
- Resize the box to keep the text clear of the artwork.
- Click Save.
- Repeat for every background.
If you add a mobile image, set its Sign area separately. The Review screen and product image use the desktop image and its Sign area.
A smaller Sign area can make the text look smaller. The ordered dimensions and manufacturing files do not change. Check the production layout separately.
For the controls and limits, see Set the Sign area for each background image.
8. Include the artwork in cart and order images
These product image settings need a plan with size scaling. They are disabled on other plans.
- Open Features → Scene Editor - Background Images.
- Under Visualiser Scaling, select Scale visualisation with size.
- Select Use the selected background in the product image.
- In Manage Images, find Scene size for each background.
- Enter the real width of the whole scene in the first box.
- Click Save.
Use the Store’s measurement unit. Do not enter pixels. Include any space around the panel in the scene width.
Keep dragging, scaling and rotation off. Without size scaling, configure a Main Product Image instead. It will not change with the linked size background.
For the requirements, see Use scenes in product images.
9. Add the customiser to your store
For a compatible Shopify theme, use an app block:
- In Shopify admin, open Online Store → Themes.
- Click Edit theme.
- In the Home page menu, choose Pages or Products.
- Create a template for your semi-custom sign.
- Under Template, select Add section → Apps → Sign Customiser.
- Enter the Sign Customiser ID for this customiser.
- Click Save.
- Assign the template to your store page or product.
- Save the page or product.
Use Install with a Shopify app block for the full installation steps. If your theme has no app blocks, use the Shopify app embed method.
For another platform, follow the appropriate integration guide.
10. Test the complete order
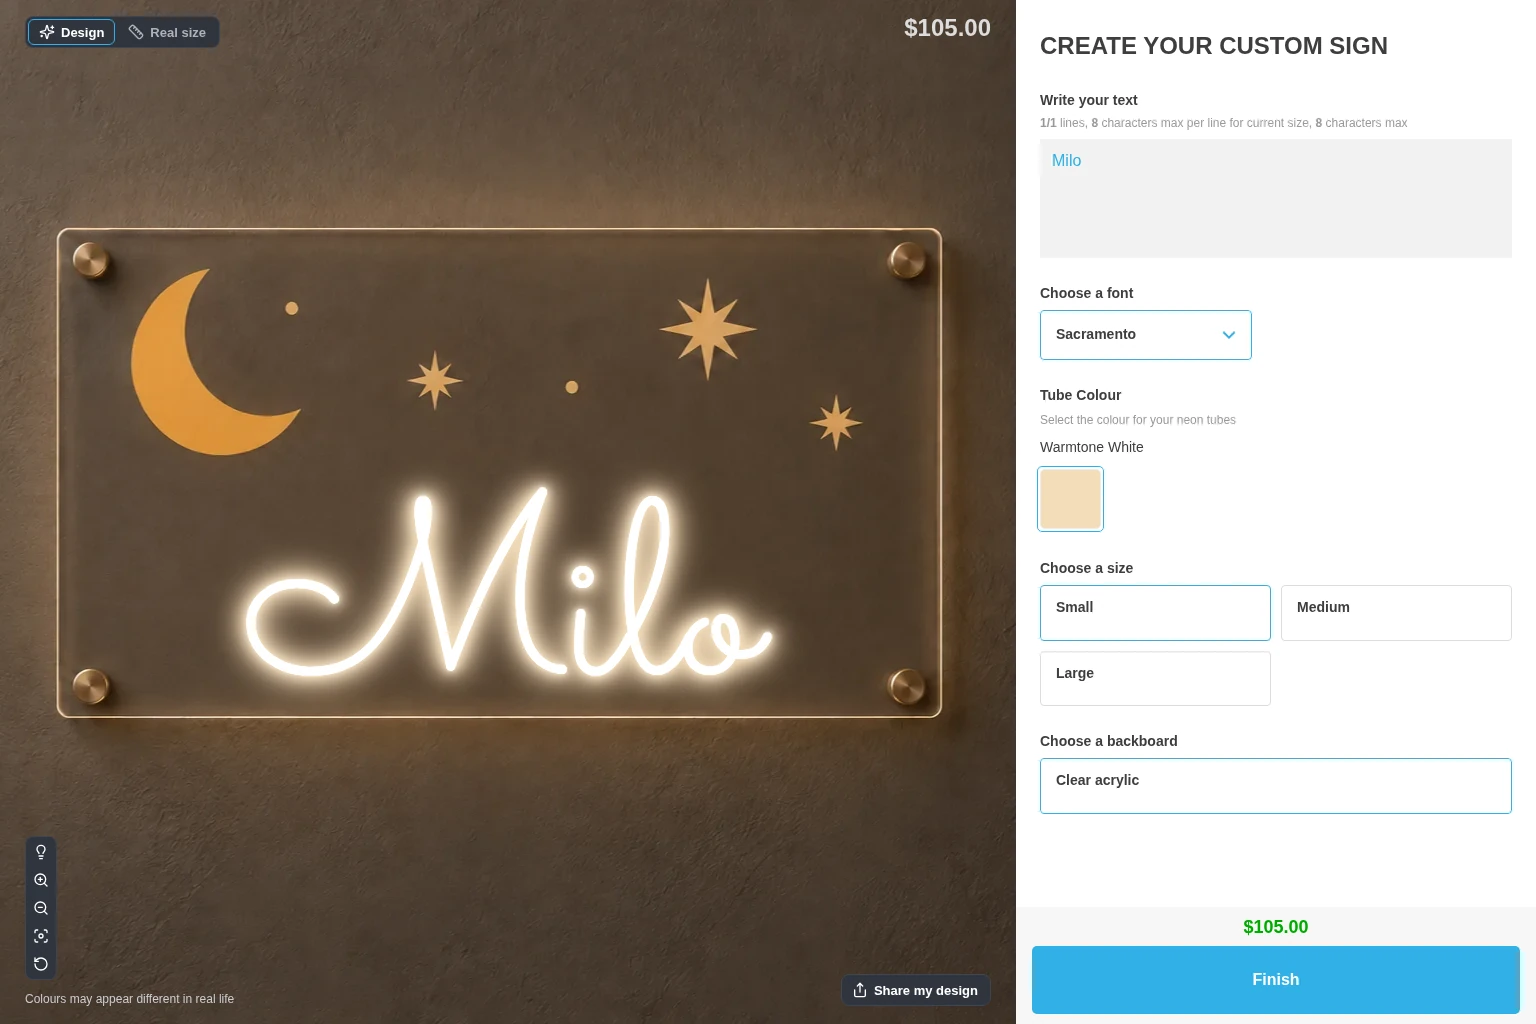
The same background with a different name. Sign Customiser renders Milo when the customer changes the text.
Open the customer customiser on your storefront. Check it on a phone and a desktop screen.
- Change between every preset size. Check the artwork and name position.
- Test a short name and the longest allowed name in every font.
- Test wide letters. Check that text stays clear of the artwork.
- Check that customers cannot drag the text, replace the background or upload artwork.
- Compare short and long names at the same size. Check that the base price stays the same.
- Check the total for each colour, backboard and mounting choice.
- Open Review. Check the selected artwork and text.
- Add the sign to the cart. Check its image, dimensions, text, options and price.
- Use your store’s test-order process. Check delivery charges and the resulting order details.
- If you use manufacturer emails, check a test email in an inbox that you control.
- If your plan and settings generate design files, open the available files. Check the text dimensions against your original production artwork.
The preview is not a cutting template or production proof. It can shrink text without changing the manufacturing files. Combine the personalised design with your original artwork in your production workflow. Check the complete layout before manufacture.
For the handoff, see Order fulfilment and Supplier and manufacturer emails.