Pricing - Advanced letter model
Last updated:
Pricing in the Advanced Letter Model allows you to combine multiple calculations to create a pricing structure that reflects your real production costs.
Unlike fixed-size pricing, this model calculates costs based on the actual material length required to produce each letter. The system traces the precise outlines of every character and multiples them by your material rate, resulting in highly accurate pricing.
This guide explains how to configure the Pricing settings for the Advanced Letter Model.
Works with AI Sign Designer
The Advanced Letter Model supports AI Sign Designer for neon signs and channel letter signs (Acrylic and Metal). AI-generated SVG designs are measured using the same material length calculations as typed text — the system traces every path in the converted SVG and prices it by your cost per centimetre. To enable AI Sign Designer on a Material Length customiser, see the AI Sign Designer Guide.
Accessing the Pricing Settings
-
Go to the Sign Customiser Admin:
-
Universal subscribers: Go to Home in your account.
-
Shopify users: Navigate to Shopify admin → Apps and select Sign Customiser.
-
-
Click on Customisers in the menu.
-
Select your customiser.
-
From the left-hand menu, go to Core Setup → Pricing.
Step 1: Create a New Pricing
-
In the Pricing section, click Add new pricing (or edit an existing size).
-
Under the Advanced Letter Price Settings, enter:
- Label – internal use
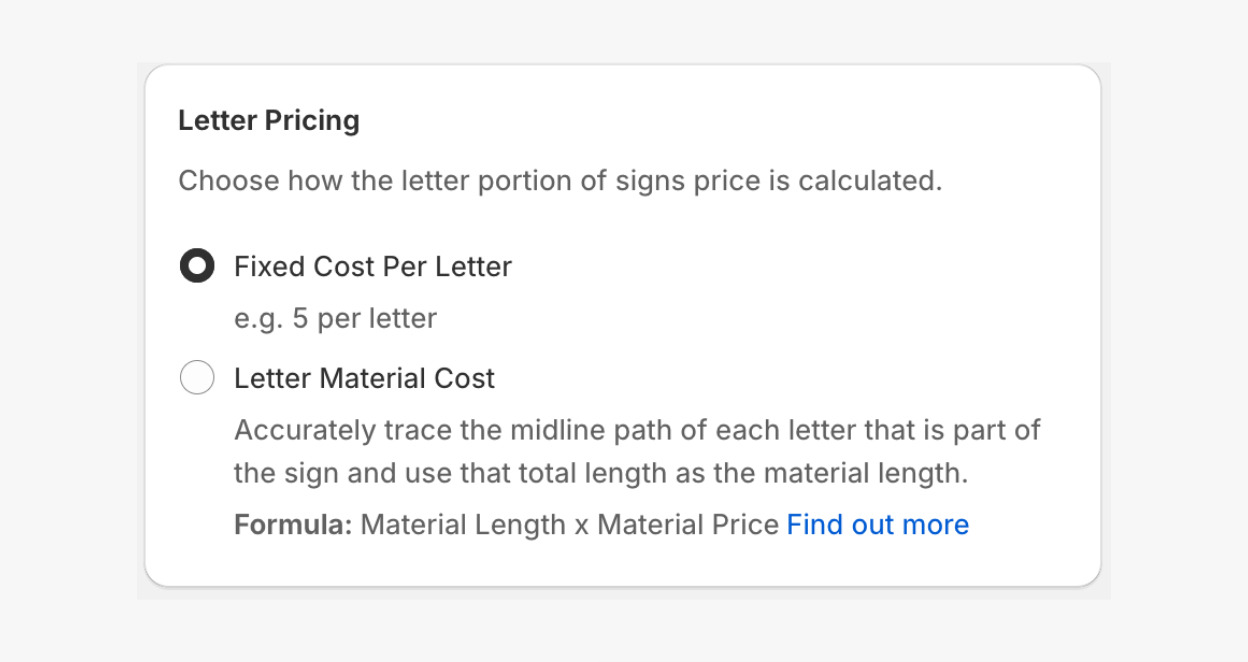
Step 2: Configure Letter Pricing
There are two ways the letter portion of the sign can be priced:
-
Fixed Cost Per Letter
-
Letter Material Cost
Fixed Cost Per Letter
Charges a fixed amount per letter within a size boundary, e.g. $5 per letter.
This is best for simpler pricing where material variation is minimal.
Letter Material Cost
Calculates pricing based on the exact material length required to cut each letter. The system traces the cutting path and multiplies it by your cost per centimetre. _Follow this guide for further details: Letter Material Cost._
Configure Letter Pricing
-
Scroll to Letter Pricing.
-
Choose:
-
Fixed Cost Per Letter, or
-
Letter Material Cost
-
-
Click Save.
Step 3: Configure Sign Dimension Pricing (Shipping Logic)
Before you begin, make sure you have:
-
Your shipping partner’s pricing method (area or volumetric).
-
Parcel dimensions (length, width, height).
-
Packaging allowances, if applicable (e.g. foam inserts or protective wrapping).
Shipping or dimensional costs can be set in two ways:
-
CM² - Flat Parcel
-
CM³ - Volumetric Parcel
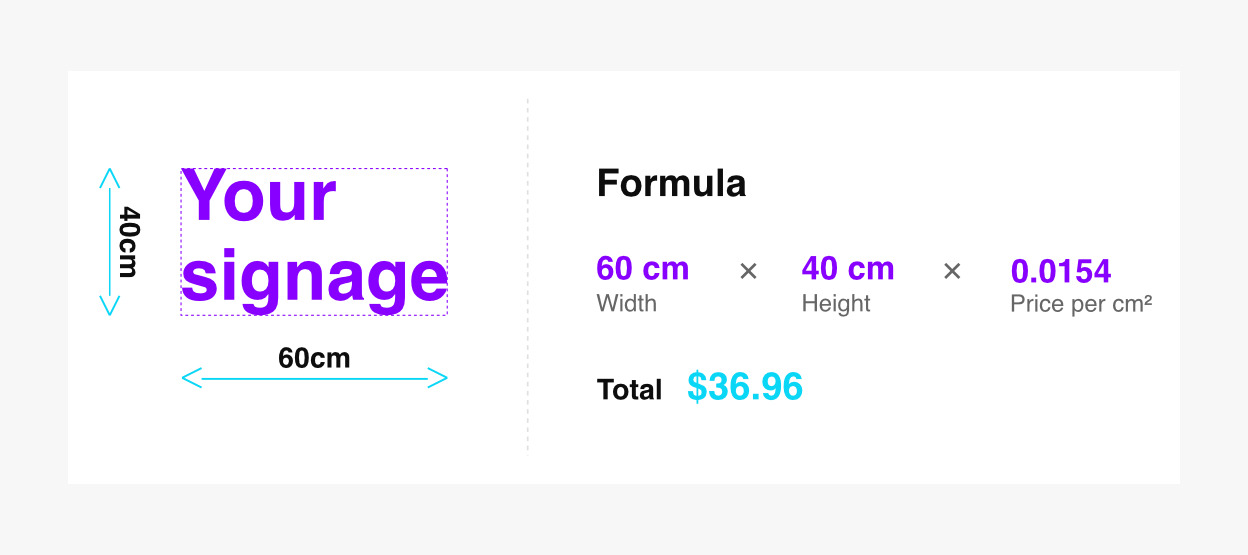
CM² - Flat Parcel
Shipping is calculated based on the sign’s surface area (width × height).
Shipping can be defined within each size boundary as either:
-
A flat parcel cost, or
-
A price per cm² (the other value is calculated automatically)
Example
If a sign is 40 cm × 60 cm and your rate is 0.0154 per cm², the shipping cost is calculated using the total surface area.
CM³ - Volumetric Parcel
Volumetric weight (also called dimensional weight or volumetric mass) is calculated by multiplying the length, width, and height of a package and then dividing by a volumetric divisor provided by the shipping carriers. The volumetric divisor is a numerical value provided by your shipping partner and represents the amount of space one unit of weight occupies in their containers. e.g., couriers like UPS and FedEx commonly use a divisor of 5000.
Volumetric weight is used when a package is relatively light compared to its size, ensuring shipping costs are calculated fairly based on the space it occupies.
Note
The option to add weight to generated products is currently only available on Shopify, not for Universal accounts or via custom integration.
Configure Volumetric Parcel Pricing
-
Scroll to Sign Dimensions Pricing.
-
Choose:
-
CM² - Flat Parcel, or
-
CM³ - Volumetric Parcel
-
-
(For Shopify users only) If using CM³ - Volumetric Parcel, set:
-
Check or uncheck the Add weight to product instead of calculating price option:
-
Unchecked – shipping cost is added to the product price (in Size Boundaries).
-
Checked – volumetric weight is added to the generated Shopify product, and Shopify calculates shipping at checkout (see Configure Shopify Shipping).
-
-
Enter your Volumetric divisor number provided by your shipping partner.
-
-
Click Save.
Using Shopify Shipping – For Shopify Users Only (Optional)
Instead of calculating shipping in the app, you can use Shopify shipping rates.
To enable this:
-
Select CM³ - Volumetric Parcel (see Step 3: Configure Sign Dimension Pricing)
-
Enable Add weight to product instead of calculating price option
Then configure shipping in Shopify:
Step 1: Set up Shipping in Shopify
-
Go to Shopify → Settings → Shipping and Delivery.
-
Edit the General Shipping Profile.
Important
All products generated by the Sign Customiser app are added here.
Custom profiles cannot be used for this purpose.
Step 2: Create Shipping Zones
If you ship to multiple countries or regions, you need to create shipping zones.
For detailed setup instructions, see Setting up shipping zones.
Step 3: Add Shipping Rates
For each zone, add a rate for each weight range listed in your supplier’s shipping table.
For detailed setup instructions, see Setting up flat shipping rates.
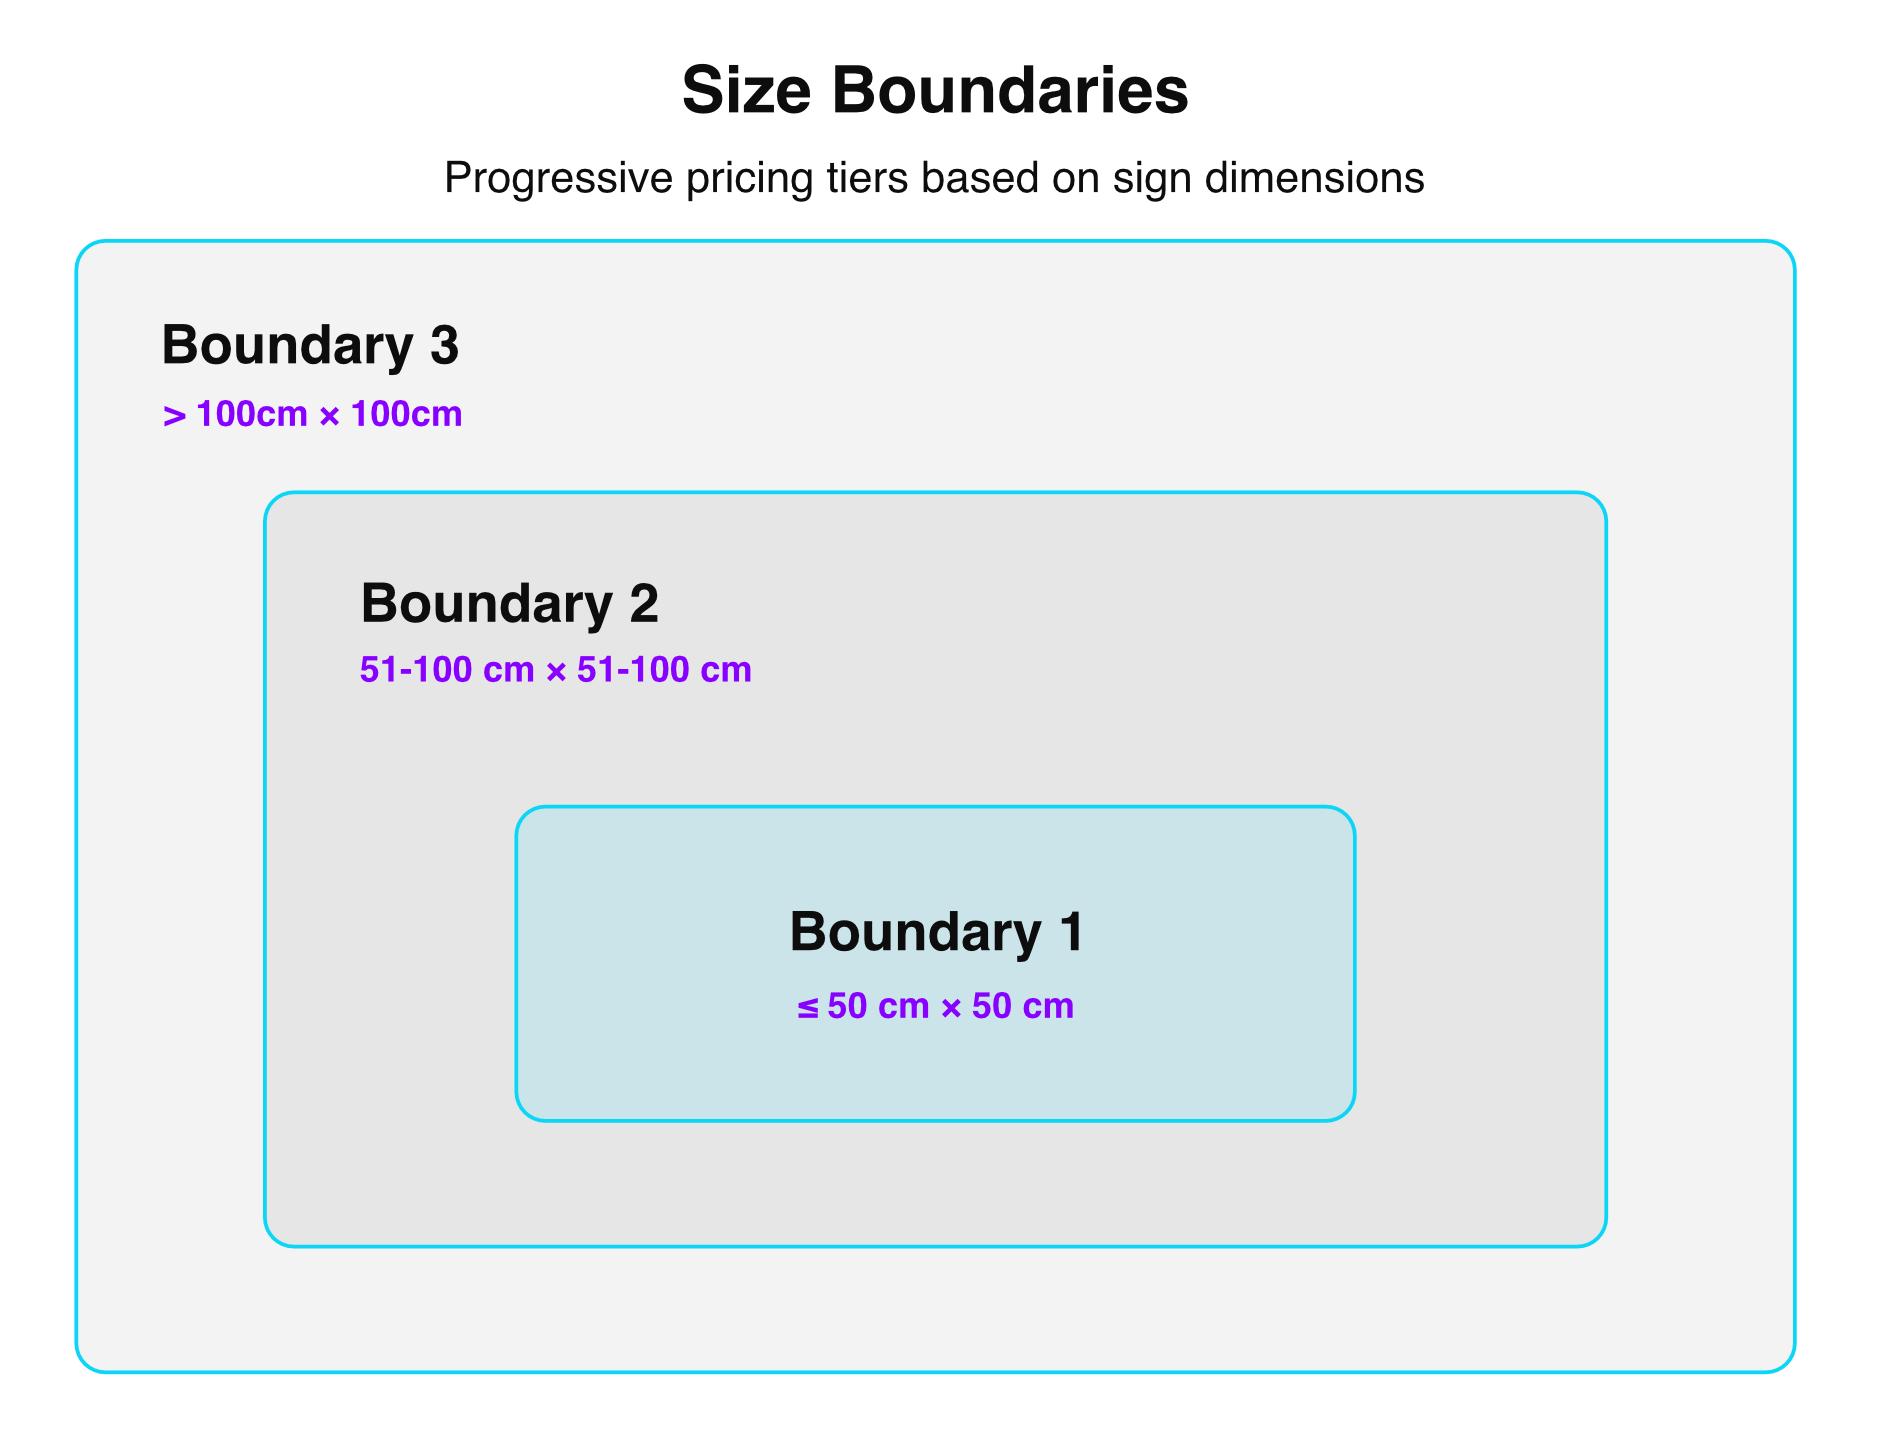
Step 4: Add Size Boundaries
Size boundaries are pricing tiers based on sign dimensions. They allow you to adjust pricing as the sign size increases.
For example:
-
Smaller signs → higher cost per unit.
-
Larger signs → lower cost per unit.
How Size Boundaries Work
The system follows these rules:
-
First Match Rule – The first matching boundary the sign fits in is applied
-
Infinity Rule – The last boundary applies to all larger signs
-
Both Dimensions Apply – A sign must fit within both width AND height limits for that boundary to apply
-
Progressive Sizing – Each boundary must be larger in size than the previous one in all dimensions, and have positive numbers
-
One Boundary Minimum – at least one size boundary is required
-
Immediate Effect – Changes apply to new orders instantly
Tips for Success
-
Start Simple – Start with 2-3 size boundaries and expand as needed
-
Consider Your Costs – Set boundaries where material or labour costs significantly change
-
Test Your Pricing – Use the preview function to verify pricing accuracy
-
Regular Reviews – Review and adjust boundaries as your business grows
Example Scenarios
Example 1
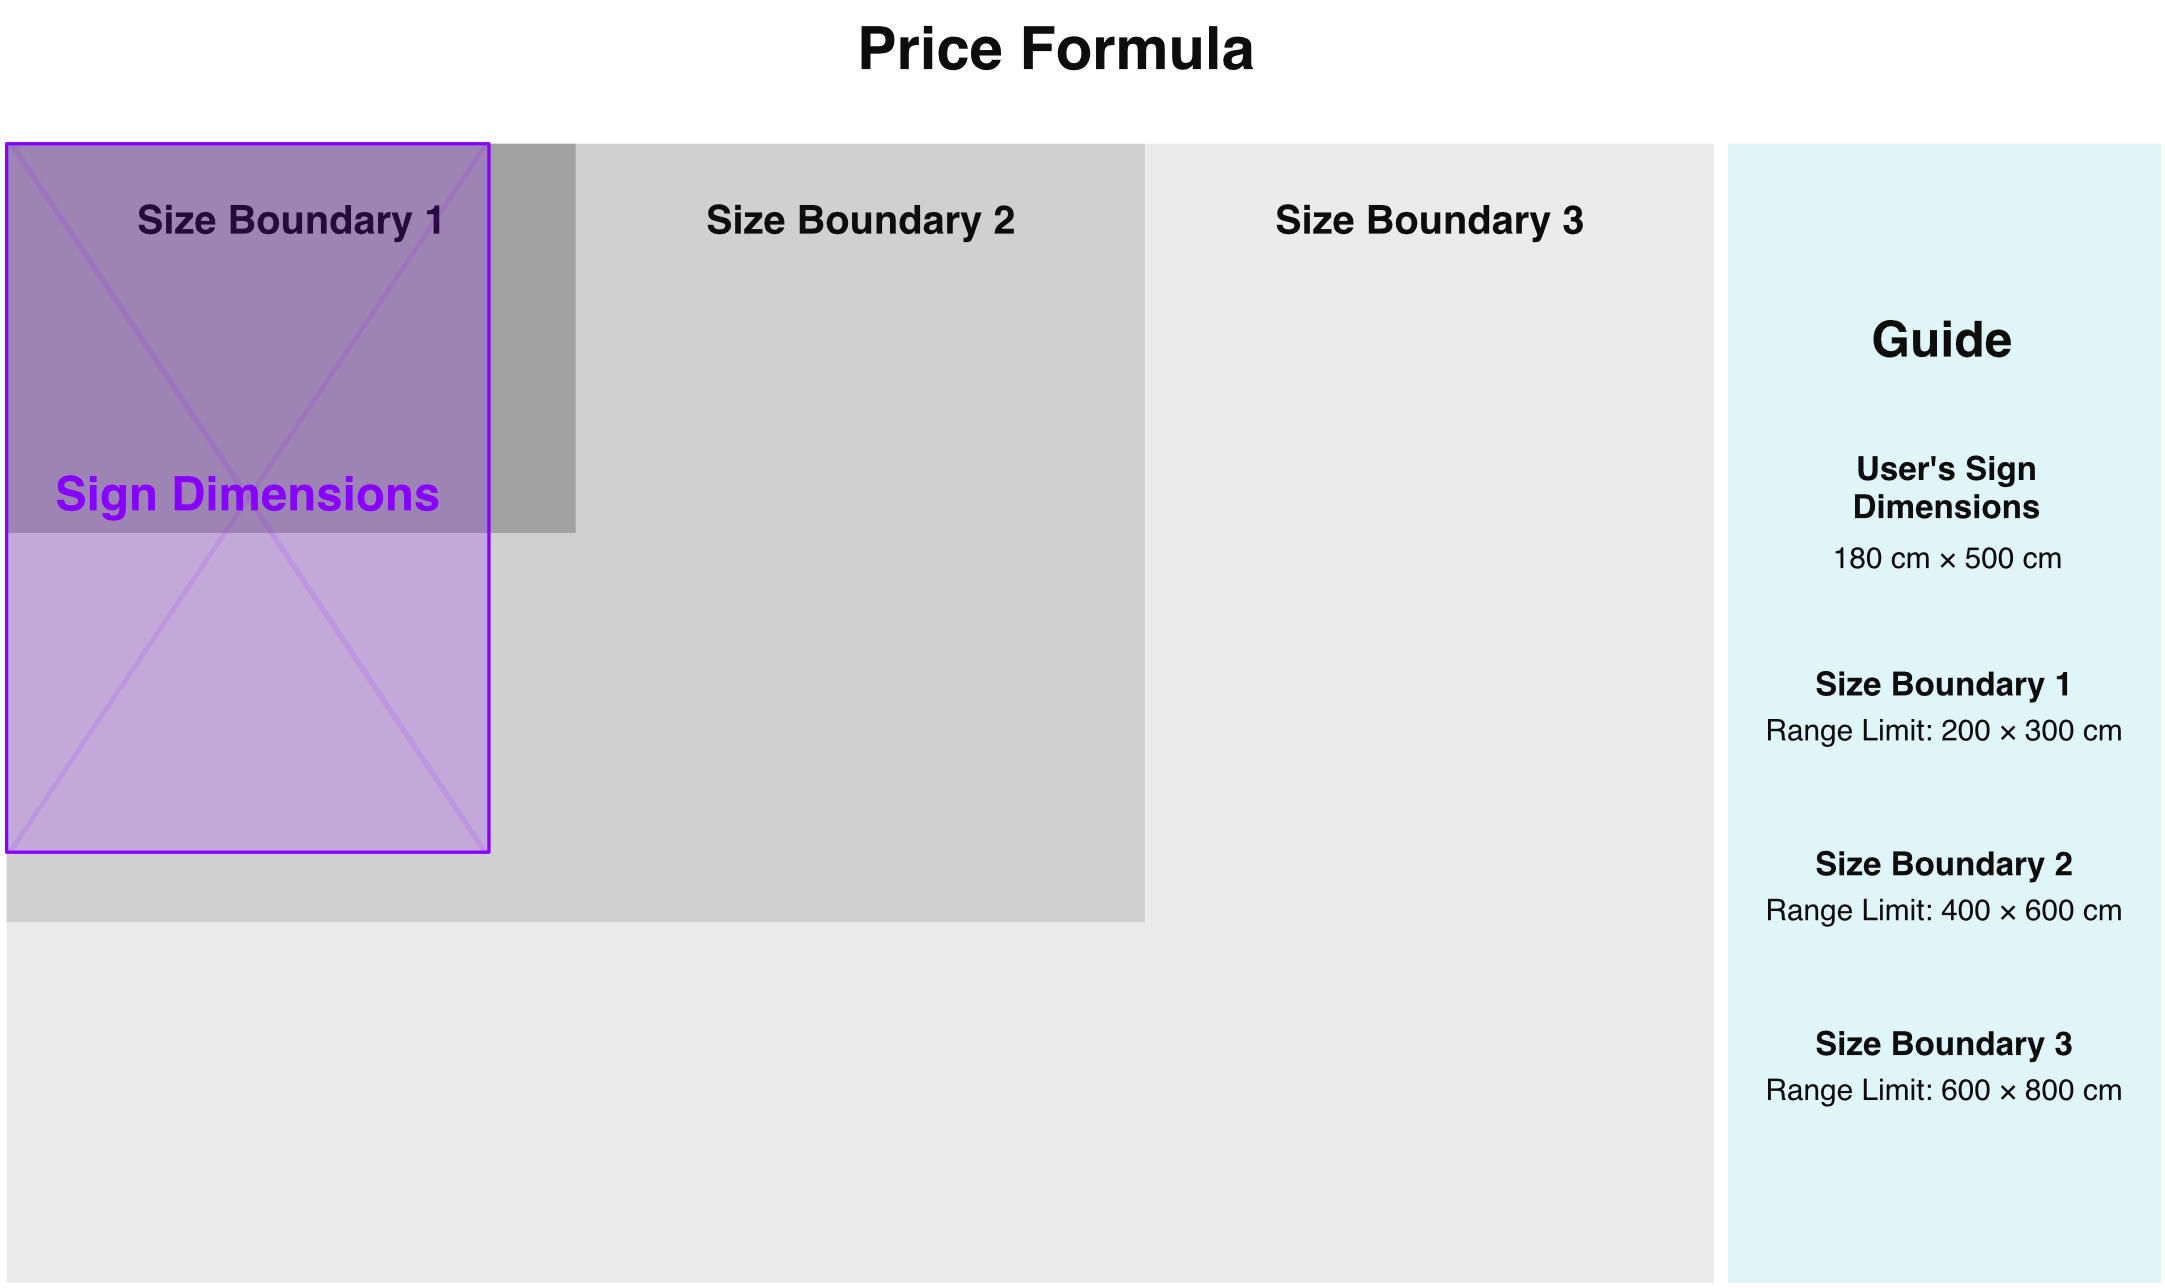
In the example below, the sign’s height falls within Size Boundary 2, but because the sign’s width exceeds Size Boundary 2, Size Boundary 3’s pricing (material, shipping, base price, etc.) is used.
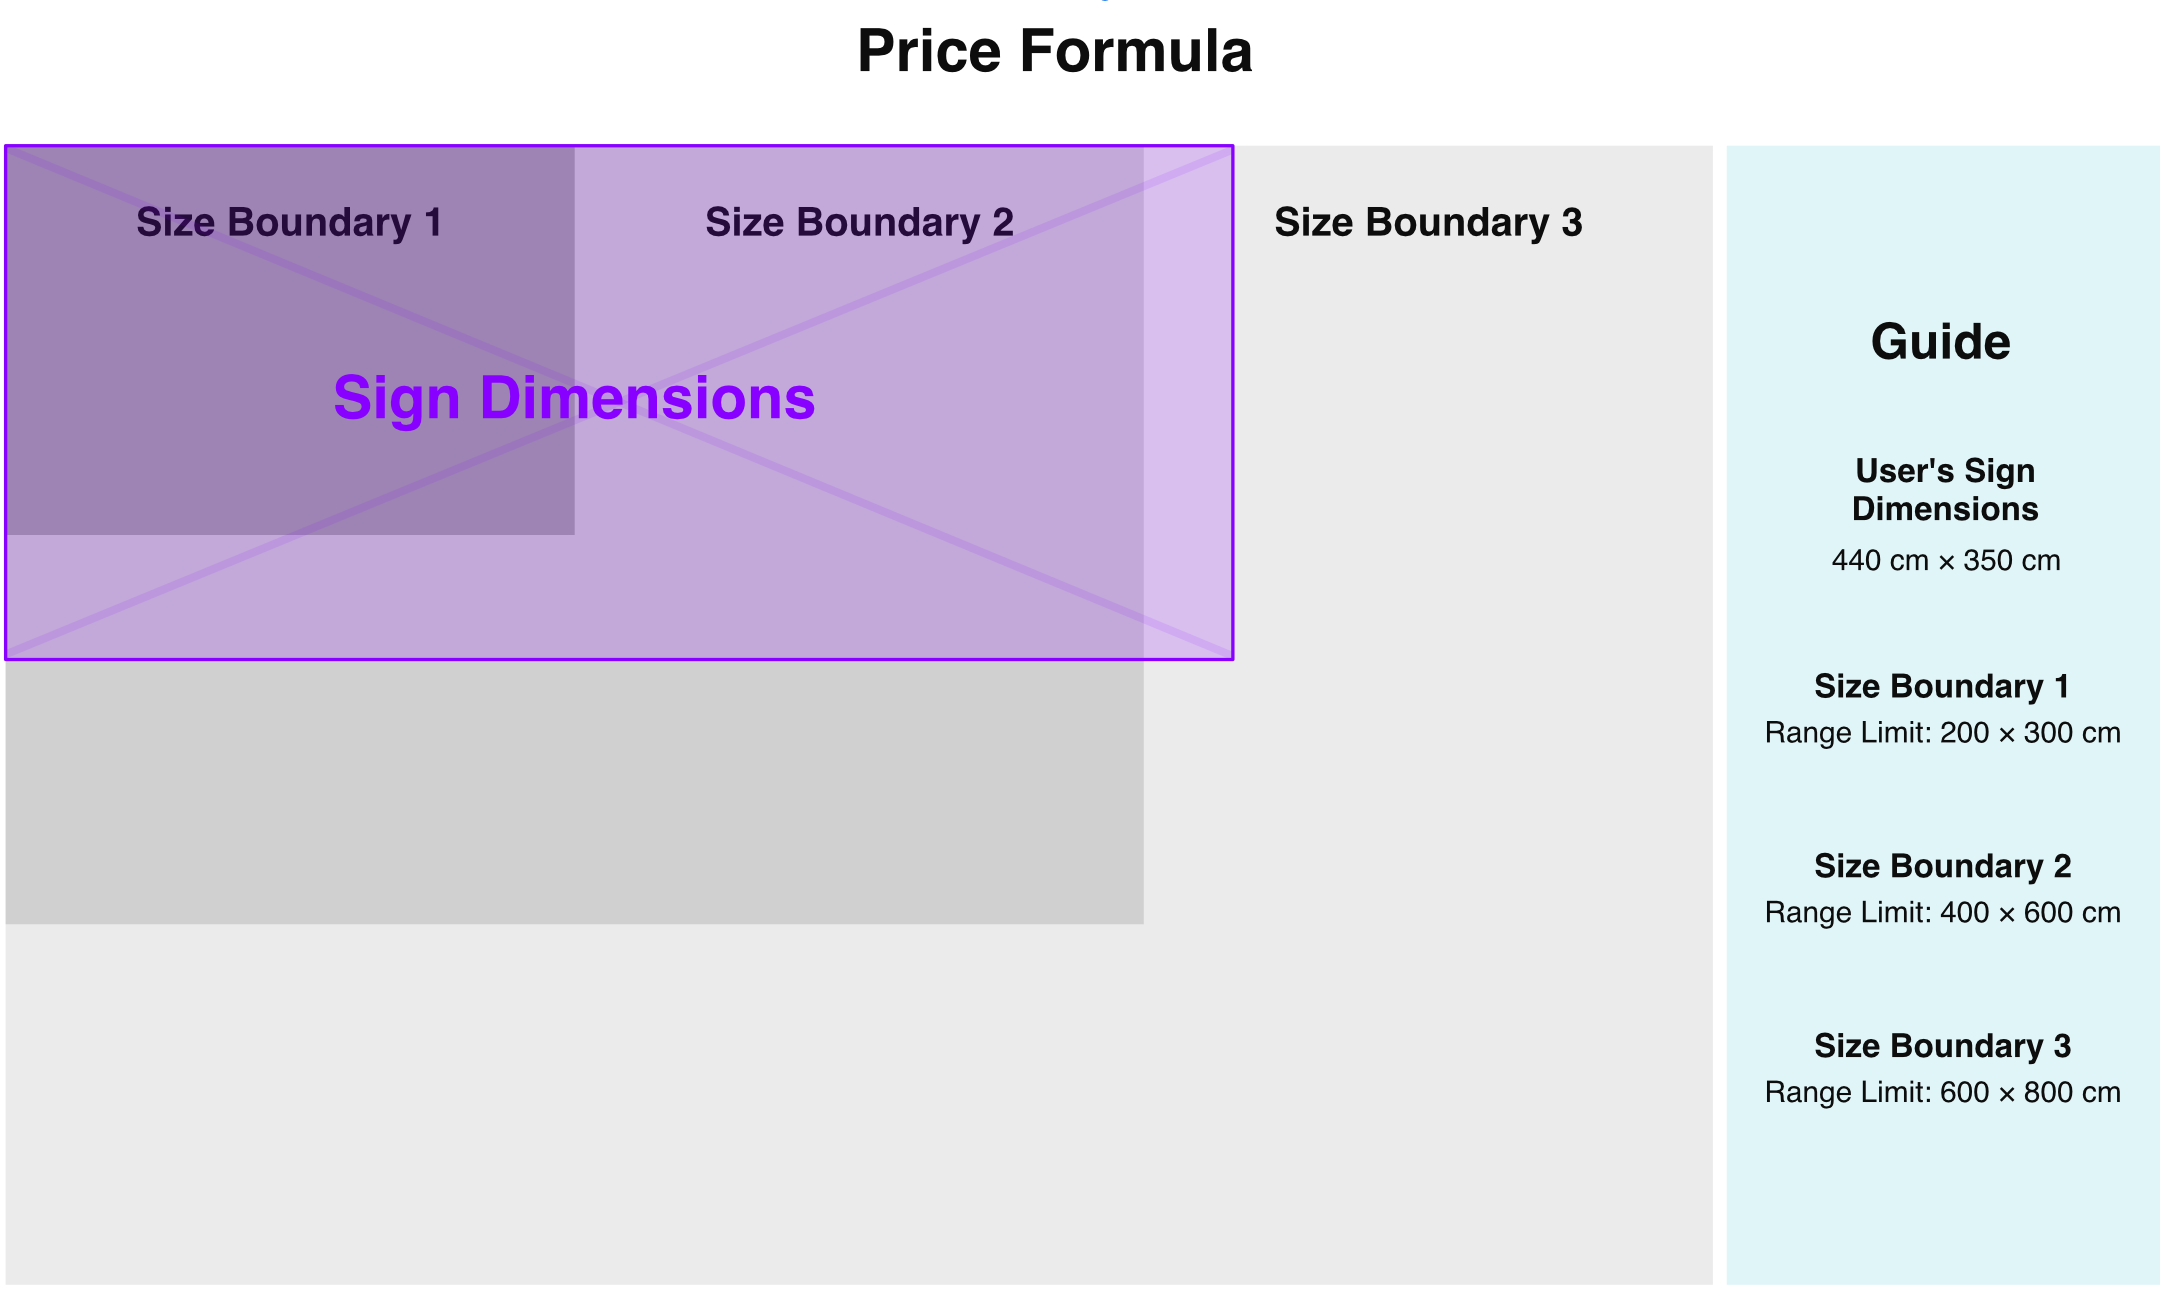
Example 2
In the example below, the sign’s width falls within Size Boundary 1, but because the sign’s height exceeds Size Boundary 1, Size Boundary 2’s pricing (material, shipping, base price, etc.) is used.
Create or Edit a Size Boundary
-
Scroll to Size Boundaries.
-
Click Add size boundary or edit an existing one.
-
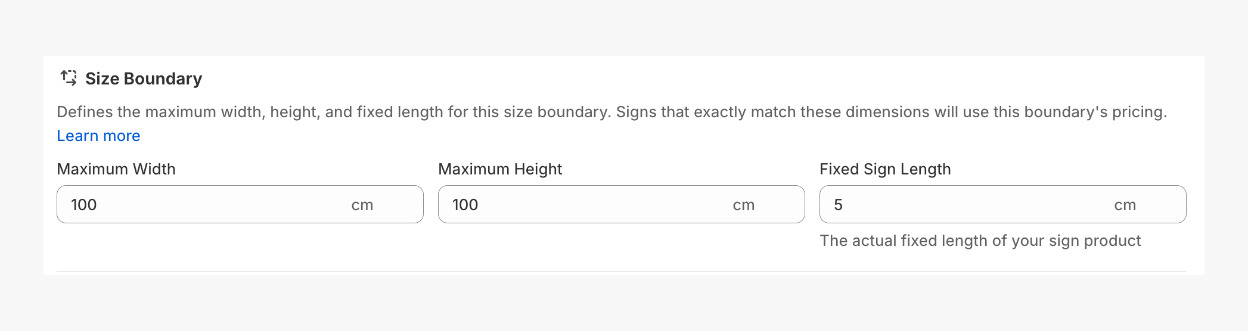
In the Size Boundary section, set the following dimensions:
-
Maximum Width
-
Maximum Height
-
Fixed Sign Length – not shown on visualiser (only for CM³ - Volumetric Parcel)
-
-
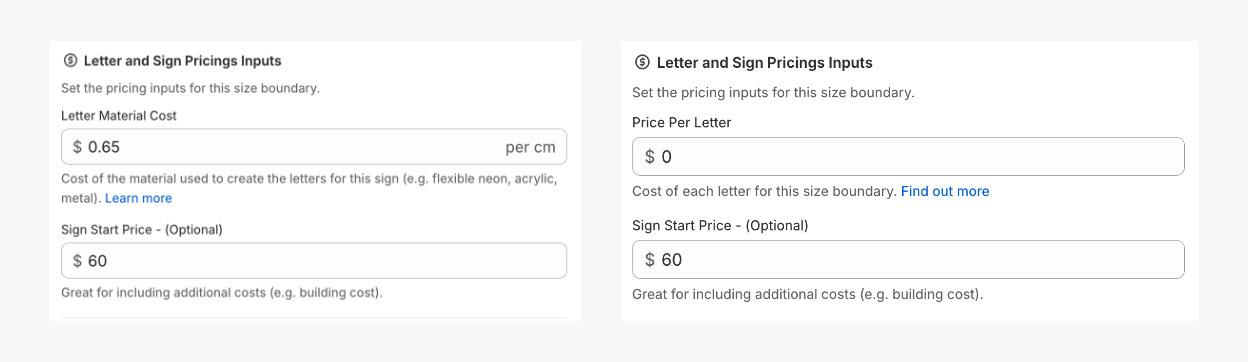
In the “Set the pricing inputs for this size boundary” section, set:
-
Letter Material Cost – if using Letter Material Cost
-
Price per Letter – if using Fixed Cost per Letter
-
Sign Start Price (optional base cost)
-
-
Set Shipping Configuration. If using CM² - Flat Parcel, set the following in the Sign Dimension Price section:
-
Parcel Cost, or
-
Price per cm² (the other value is calculated automatically)

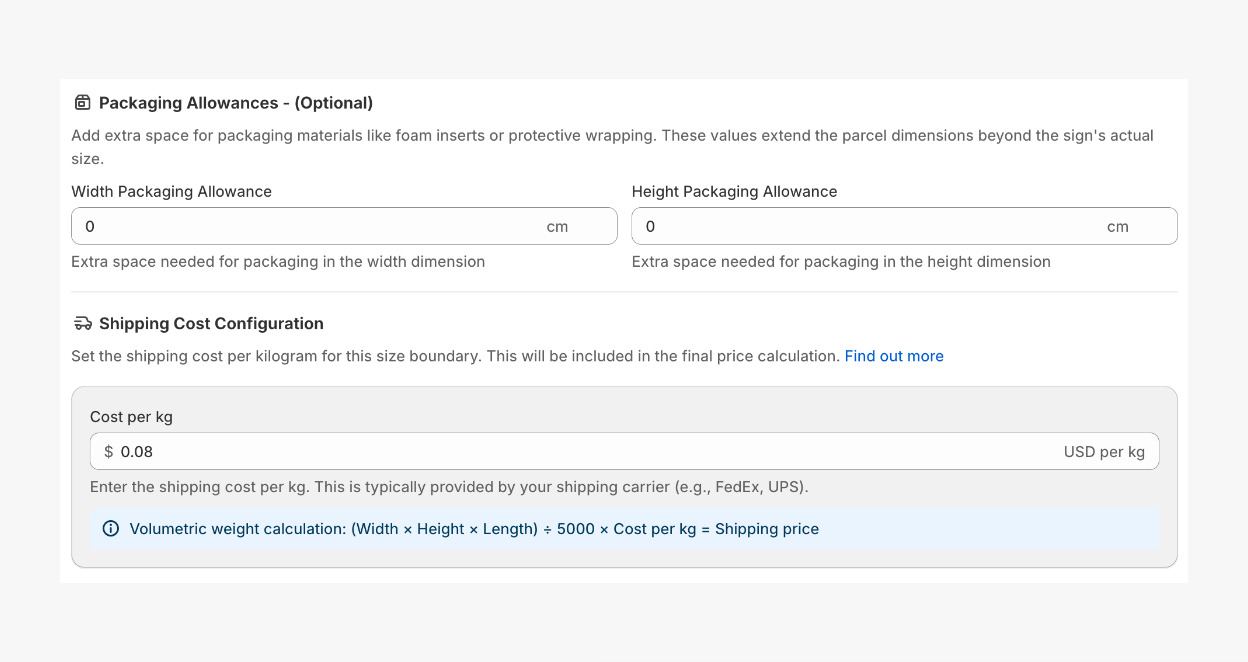
If using CM³ - Volumetric Parcel, set the following in the Packaging Allowances section:
-
Width Packaging Allowance
-
Height Packaging Allowance
-
Cost per kg (provided by your carrier) in the Shipping Cost Configuration section
-
Your Advanced Letter Pricing setup is now fully configured. You can now proceed to Fonts.