
Size and price custom shape signs
Learn how Custom Shape backboards set the size, price and cut file on a Frame Fit customiser, and how to set the limits and customer messages.
Last updated:
A custom shape is an outline that you upload as an SVG file. Examples are a plaque, a circle or a star. Sign Customiser measures the outline. It uses the measured proportions for the size on screen, for the price and for the cut file. Your manufacturer receives the cut file. This article is for merchants who sell signs cut to a custom shape on a Frame Fit customiser.
How it works
A shape has its own proportions. A circle is round only when its width is the same as its height. So the customer cannot set the width and the height separately. The customer sets one dimension. The other dimension follows from the shape.
-
The customer sees no preset size cards. The customer sees one custom size panel.
-
Sign Customiser measures the painted outline of your SVG file, not the size that the
viewBoxdeclares. The file still needs aviewBox(or a width and a height), because the padding percentages are measured against it. -
The price and the cut file use the same measured size that the customer sees.
Before you start
-
Use a customiser with the Frame Fit pricing model. Other pricing models do not use this behaviour.
-
Braille, Lightbox, Cut-out Metal and Stencil customisers do not use this behaviour.
-
Prepare an SVG file with solid fills. See Backboard shapes: Why Are “Fill” Attributes Important for Your SVG Files?
-
For more about backboards, see Backboards.
Step 1: Set the border margin to 0
A shape sets its own outline. So a shape cannot have a border margin.
-
Open the Sign Customiser admin. In the Universal admin, click Customisers. In the Shopify admin, open the app that you installed from the Shopify App Store and click Customisers.
-
Click the name of your Frame Fit customiser.
-
In the menu on the left, go to Core Setup → Sizes.
-
In the Border / bleed card, set Border margin (centimetres) to 0. On a Store that uses inches, the field is Border margin (inches).
-
Click Save.
Sign Customiser shows an error in these two cases:
-
You save a Custom Shape backboard when the border margin is more than 0. The error says: “Custom shapes own their proportions and cannot use a border margin. Set the default border margin to 0 first.”
-
You save a border margin of more than 0 when a Custom Shape backboard exists. The error says: “Border margins can only be used with free-rectangle supports. Set the margin to 0 before using a custom shape.”
When you save a Custom Shape backboard and one or more sizes have a border margin of more than 0, Sign Customiser sets those margins to 0. It then shows this message: “Custom shapes own their proportions, so existing per-size border margins were reset to 0.” If no size has a border margin, no message shows.
Step 2: Add the Custom Shape backboard
-
In the menu on the left, go to Sign Components → Backboards.
-
Add a backboard or open an existing backboard.
-
In the Visualisation section, select Custom Shape.
-
Upload your SVG file or choose a shape from the library.
-
Set the padding in the Top, Left, Right and Bottom fields. The padding keeps the sign text inside the shape.
-
Click Save.
Sign Customiser measures the shape when you add the SVG file or change its padding. The form can show the three items below before you click Save:
-
Tight painted-bounds preview: the outline that Sign Customiser measured.
-
Intrinsic ratio: the width divided by the height. An example is 1.5:1.
-
Feasible finished size: the smallest size and the largest size that a customer can choose.
After you save a change to an existing backboard, the form can show Measuring custom shape while Sign Customiser measures the saved shape again. The form does not check again on a timer. Load the page again to see the latest state.
If the form shows Shape measurements unavailable, click Retry shape measurements.
Important: When you save a change to a shape or to its padding, the live customiser does not show the shape. It shows the shape again when the new measurement is ready.
Step 3: Set the size limits
The limits set the smallest custom size and the largest custom size that the customer can choose. They apply to the custom size of every backboard in the customiser. They do not filter preset size cards.
-
In the menu on the left, go to Core Setup → Sizes.
-
If the Custom Size Settings card is hidden, go to the Custom Sizing card and select Enable Custom Sizing.
-
In the Custom Size Settings card, set Minimum Sign Width and Minimum Sign Height.
-
Under Maximum sign dimensions, open Maximum Sign Width, select Width limit and enter the width. Do the same under Maximum Sign Height with Height limit. A width or height that you leave at Unlimited width or Unlimited height has no maximum.
-
Click Save.
The customer can choose only a size that is inside every limit that you set. A maximum set to Unlimited width or Unlimited height is not a limit.
Warnings about a shape
The Sizes page and the Review Screen page show a warning when the limits or the padding of a shape need a change.
-
Custom shapes have no feasible customer size: no size is inside every limit that you set. The warning lists the shapes. Change the limits. The customer cannot add the sign to the cart until the limits overlap.
-
Custom shape padding must be reduced: the paired padding of a shape is 100% or more. The left padding and the right padding make one pair. The top padding and the bottom padding make the other pair. Reduce the padding until each pair is less than 100%.
What the customer sees
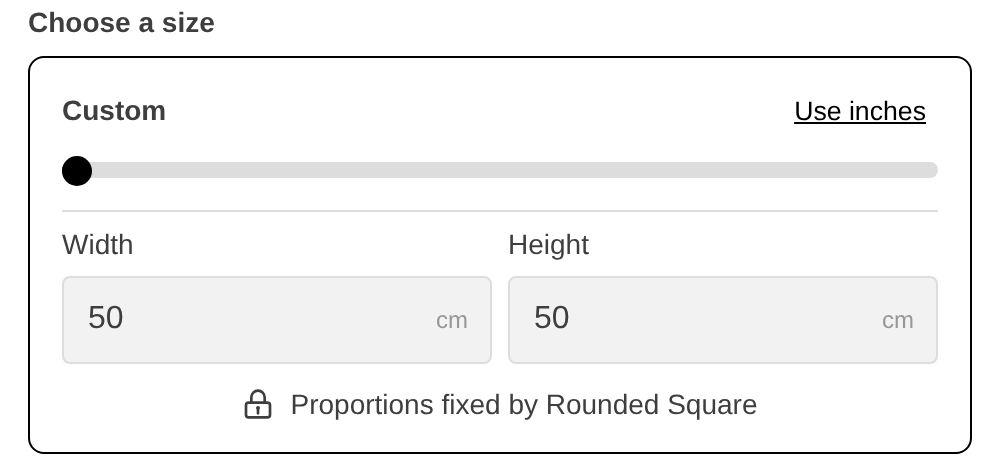
When the customer chooses a Custom Shape backboard, the size section changes:
-
The size section has no preset size cards. It shows one panel with the title Custom. To change the title, select Enable Custom Sizing in the Custom Sizing card on the Sizes page. Then use the Custom size label field.
-
The panel has a slider, a Width field and a Height field.
-
If your Store allows centimetres and inches, the panel also shows Use inches or Use cm.
-
Under the fields, a padlock shows with the text “Proportions fixed by” and the name of the backboard.
The customer has two ways to set the size:
-
Move the slider. The width and the height change together.
-
Type a width or a height. Then press Enter or click outside the field. The other dimension changes to keep the proportions of the shape.
The padlock is only a notice. The customer cannot unlock the proportions.
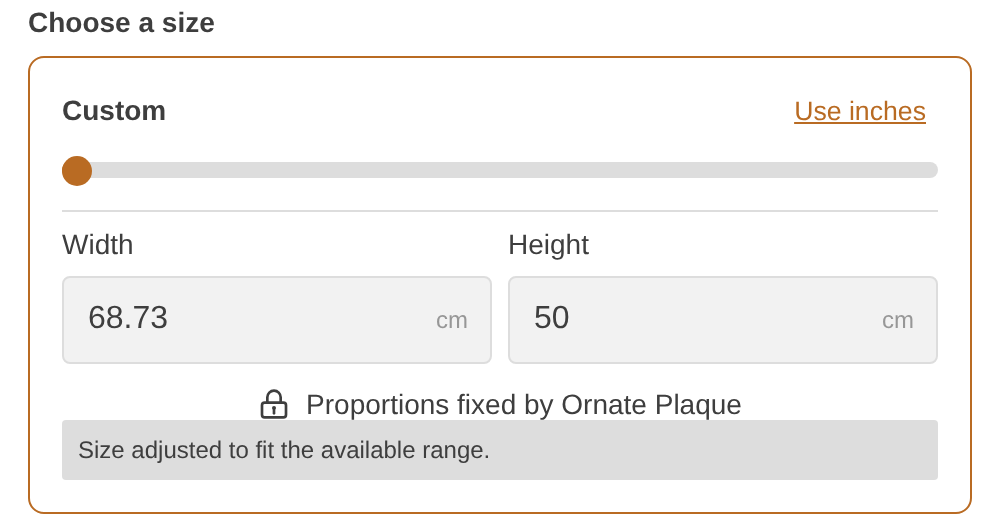
The panel can show these messages:
-
“Size adjusted to fit the available range.” The starting size, or a size that the customer types or chooses, is outside your limits. The customiser used the nearest size that you allow.
-
“Your saved size was adjusted to match this shape’s fixed proportions.” The customer opened a saved design. Its stored size did not match the shape.
-
“This shape cannot be sized within the available minimum and maximum dimensions.” No size is inside your limits. The customer cannot add the sign to the cart.
If the customer chooses a backboard that is not a Custom Shape, the size section uses your normal size settings.
How the price and the cut file work
Price. Frame Fit uses the finished width and the finished height of the shape to choose the size boundary. The size boundary sets the starting price. See Frame Fit Model. The Price per square cm option of a backboard does not apply to Frame Fit.
Cut file. For each sign that a customer adds to the cart, Sign Customiser makes an SVG file for your manufacturer. The file shows the outline of the shape at the finished size that the customer chose. Sign Customiser converts the text to outlines, so the file is ready for cutting. If Sign Customiser cannot make the file, the customer cannot add the sign to the cart. To find the file on an order, see How to find the SVG, EPS, .AI file in the Shopify.
Change the customer messages
You can change the text that customers see for custom shapes.
-
In the menu on the left, go to Features → Review Screen.
-
Select Enable review screen. The other sections of the page then show.
-
In the Chosen options section, scroll to Shape sizing messages.
-
Change the text in the fields. Leave a field empty to use the default text.
-
Click Save.
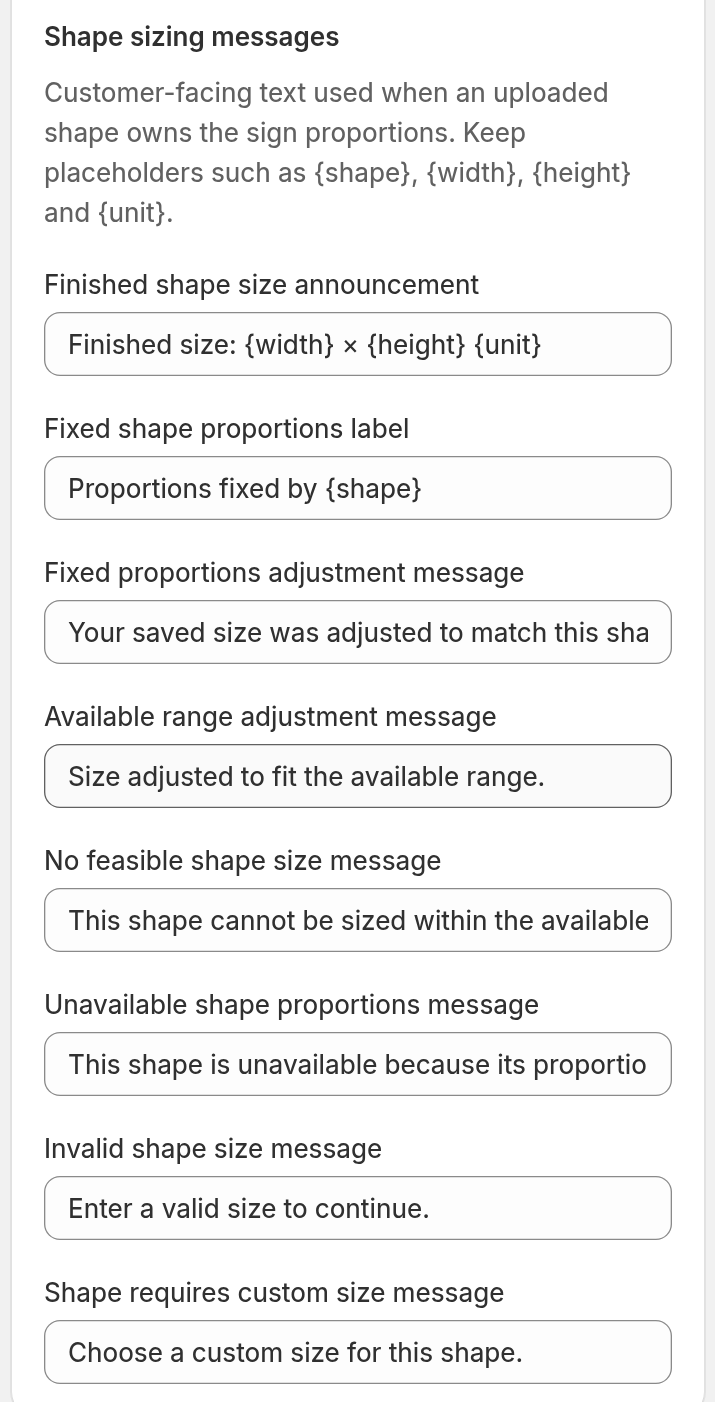
The first message in the table is read by a screen reader only. It does not show as text. The other seven messages show in the size section of the customiser. Four of them also show on the review summary and in the add-to-cart message when the shape cannot be sold. These four are No feasible shape size message, Unavailable shape proportions message, Invalid shape size message and Shape requires custom size message.
Field | Default text |
Finished shape size announcement | Finished size: {width} × {height} {unit} |
Fixed shape proportions label | Proportions fixed by {shape} |
Fixed proportions adjustment message | Your saved size was adjusted to match this shape’s fixed proportions. |
Available range adjustment message | Size adjusted to fit the available range. |
No feasible shape size message | This shape cannot be sized within the available minimum and maximum dimensions. |
Unavailable shape proportions message | This shape is unavailable because its proportions could not be loaded. |
Invalid shape size message | Enter a valid size to continue. |
Shape requires custom size message | Choose a custom size for this shape. |
Keep the placeholders {shape}, {width}, {height} and {unit} where they show in the default text. The placeholder {shape} becomes the name of the backboard. A screen reader reads the first message aloud when the customer moves the slider. These fields also show on the Languages page. You can translate them there.
Limits
-
Only Frame Fit customisers use this behaviour.
-
The live customiser does not show a shape that Sign Customiser has not measured.
-
The border margin must be 0.
-
The shape sets the ratio. The customer cannot change it.